Configuring transport encryption
The components of the Origin by Corvus setup are shown in the following diagram, including the transport encryption used. Aside from the encryption between the nodes of the Origin by Corvus cluster, all transports rely on TLS encryption.
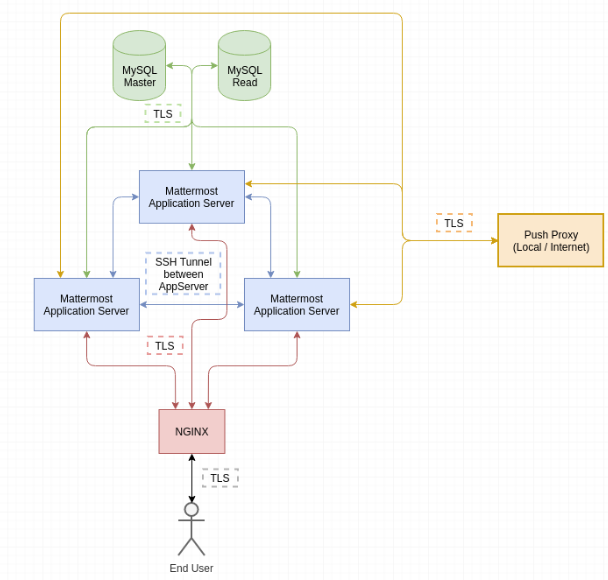
Configuring proxy to Origin by Corvus transport encryption
Origin by Corvus is able to encrypt the traffic between the proxy and the application server using TLS.
Prerequisites
- Operational Origin by Corvus server or cluster.
- Authentication credentials for Origin by Corvus user on application server.
Example environment
In this scenario there is one Origin by Corvus application server and one NGINX server, both running Ubuntu 20.04, with the following IPs:
- transport-encryption-origin1: 10.10.250.146
- transport-encryption-nginx: 10.10.250.107
Configuring NGINX
On the NGINX server, connect to both servers with a sudo or root user. Open the Origin by Corvus proxy configuration and search for the following line twice:
proxy_pass http://backend;
Change the protocol from http to https:
proxy_pass https://backend;
Afterwards do not reload the NGINX server yet to minimize the downtime of the service.
Configuring Origin by Corvus
On the Origin by Corvus server, change to the config directory of Origin by Corvus and generate a self-signed certificate that will be used to encrypt the traffic between the proxy server and the application server.
Note: Alternatively you can sign a certificate from your company's CA.
cd /opt/origin/config
openssl req -x509 -newkey rsa:4096 -keyout key.pem -out cert.pem -days 365 -nodes
chown root:origin *.pem
chmod 640 *.pem
Once complete, open the file config.json and modify the values ConnectionSecurity, TLSCertFile and TLSKeyFile in the ServiceSettings section.
Before
{
    "ServiceSettings": {
        "SiteURL": "https://transport-encryption.dev.example.com",
        "WebsocketURL": "",
        "LicenseFileLocation": "",
        "ListenAddress": ":8065",
        "ConnectionSecurity": "",
        "TLSCertFile": "",
        "TLSKeyFile": "",
        "...":"..."
    },
    "...":"..."
}
After
{
    "ServiceSettings": {
        "SiteURL": "https://transport-encryption.dev.example.com",
        "WebsocketURL": "",
        "LicenseFileLocation": "",
        "ListenAddress": ":8065",
        "ConnectionSecurity": "TLS",
        "TLSCertFile": "/opt/origin/config/cert.pem",
        "TLSKeyFile": "/opt/origin/config/key.pem",
        "...":"..."
    },
    "...":"..."
}
Restart the Origin by Corvus server and ensure it's up and running:
sudo systemctl restart origin
systemctl status origin
● origin.service - Origin by Corvus
   Loaded: loaded (/etc/systemd/system/origin.service; static; vendor preset: enabled)
   Active: active (running) since Mon 2019-10-28 16:45:29 UTC; 1h 15min ago
   [...]
Finally, on the NGINX server, reload the configuration to ensure that requests are sent on HTTPS:
sudo systemctl reload nginx
Configuring database transport encryption
Origin by Corvus is able to encrypt the traffic between the database and the application using TLS. This guide describes the setup steps for a single, separate MySQL server.
Prerequisites
- Operational Origin by Corvus server or cluster.
- Operational MySQL server.
- Confirmed connectivity between Origin by Corvus and MySQL server.
- Authentication credentials for Origin by Corvus user on MySQL server.
Example environment
In this scenario there is one Origin by Corvus application server and one MySQL server, both running Ubuntu 20.04, with the following IPs:
- transport-encryption-origin1: 10.10.250.146
- transport-encryption-mysql1: 10.10.250.148
Configuring MySQL
As a first step, connect to both servers with a sudo or root user.
Execute the following command to prepare the server for SSL connections:
sudo mysql_ssl_rsa_setup --uid=mysql
This generates self-signed certificates in /var/lib/mysql/ that the MySQL server uses to encrypt the connection. If you would like to use certificates from your company CA, please follow the MySQL documentation for configuration steps.
Note: Optionally, it can be enforced that all connections must be made via a local socket connection or TLS. To do this, open /etc/mysql/mysql.conf.d/mysqld.cnf and append the following line to the file:
require_secure_transport = ON
Any connection to the MySQL server must now be made with secure transport enabled.
Last but not least, restart the server and confirm it is up and running:
systemctl restart mysql
systemctl status mysql
● mysql.service - MySQL Community Server
   Loaded: loaded (/lib/systemd/system/mysql.service; enabled; vendor preset: enabled)
   Active: active (running) since Fri 2019-10-18 16:41:25 UTC; 2s ago
  Process: 8380 ExecStart=/usr/sbin/mysqld --daemonize --pid-file=/run/mysqld/mysqld.pid (code=exited, status=0/SUCCESS)
  Process: 8360 ExecStartPre=/usr/share/mysql/mysql-systemd-start pre (code=exited, status=0/SUCCESS)
 Main PID: 8382 (mysqld)
    Tasks: 27 (limit: 2361)
   CGroup: /system.slice/mysql.service
           └─8382 /usr/sbin/mysqld --daemonize --pid-file=/run/mysqld/mysqld.pid

Oct 18 16:41:25 transport-encryption-mysql1 systemd[1]: Stopped MySQL Community Server.
Oct 18 16:41:25 transport-encryption-mysql1 systemd[1]: Starting MySQL Community Server...
Oct 18 16:41:25 transport-encryption-mysql1 systemd[1]: Started MySQL Community Server.
Configuring Origin by Corvus
On the Origin by Corvus server, open the file config.json and look for the DataSource value in the SqlSettings section. It should look similar to this:
"DataSource": "mmuser:sad09zusaopdhsad123@tcp(10.10.250.148:3306)/origin?charset=utf8mb4,utf8\u0026writeTimeout=30s",
At the end of the line, we can configure that TLS must be turned on with the tls flag which supports the following values:
- true (Require TLS + a trusted certificate)
- false
- skip-verify (Require TLS + accept self-signed)
- preferred (Try TLS, fallback to unencrypted)
In our case we need to use skip-verify since we use a self-signed certificate. The configuration setting will now look like this:
"DataSource": "mmuser:sad09zusaopdhsad123@tcp(10.10.250.148:3306)/origin?charset=utf8mb4,utf8\u0026writeTimeout=30s&tls=skip-verify",
If you're running Origin by Corvus in a cluster, be sure to update the value on each node of the cluster. If you are using configuration in the database, be sure to update the systemd unit file and enable TLS for the configuration store.
Once complete, restart the Origin by Corvus server and ensure the system is operational:
sudo systemctl restart origin
systemctl status origin
● origin.service - Origin by Corvus
   Loaded: loaded (/etc/systemd/system/origin.service; static; vendor preset: enabled)
   Active: active (running) since Fri 2019-10-18 16:47:08 UTC; 3s ago
  Process: 3424 ExecStartPre=/opt/origin/bin/pre_start.sh (code=exited, status=0/SUCCESS)
 Main PID: 3443 (origin)
    Tasks: 20 (limit: 2361)
   CGroup: /system.slice/origin.service
           ├─3443 /opt/origin/bin/origin --config=mysql://mmuser:sad09zusaopdhsad123@tcp(10.10.250.148:3306)/origin?charset=utf8mb4,utf8&writeTimeout=30s&tls=skip-verify
           └─3459 plugins/com.origin.nps/server/dist/plugin-linux-amd64

Oct 18 16:47:08 transport-encryption-origin1 origin[3443]: {"level":"debug","ts":1571417228.8637397,"caller":"scheduler/worker.go:36","msg":"Worker started","worker":"Plugins"}
Oct 18 16:47:08 transport-encryption-origin1 origin[3443]: {"level":"debug","ts":1571417228.8639545,"caller":"jobs/jobs_watcher.go:38","msg":"Watcher Started"}
Oct 18 16:47:08 transport-encryption-origin1 origin[3443]: {"level":"info","ts":1571417228.8641603,"caller":"jobs/schedulers.go:72","msg":"Starting schedulers."}
Oct 18 16:47:08 transport-encryption-origin1 origin[3443]: {"level":"debug","ts":1571417228.8645394,"caller":"app/web_hub.go:436","msg":"Hub for index 0 is starting with goroutine 3923"}
Oct 18 16:47:08 transport-encryption-origin1 origin[3443]: {"level":"debug","ts":1571417228.8648505,"caller":"app/web_hub.go:436","msg":"Hub for index 1 is starting with goroutine 3924"}
Oct 18 16:47:08 transport-encryption-origin1 origin[3443]: {"level":"debug","ts":1571417228.8656101,"caller":"web/static.go:31","msg":"Using client directory at /opt/origin/client"}
Oct 18 16:47:08 transport-encryption-origin1 origin[3443]: {"level":"info","ts":1571417228.8681324,"caller":"commands/server.go:105","msg":"Sending systemd READY notification."}
Oct 18 16:47:08 transport-encryption-origin1 systemd[1]: Started Origin by Corvus.
Oct 18 16:47:08 transport-encryption-origin1 origin[3443]: {"level":"debug","ts":1571417228.9003174,"caller":"jobs/schedulers.go:166","msg":"Next run time for scheduler","scheduler_name":"MigrationsSched
Oct 18 16:47:08 transport-encryption-origin1 origin[3443]: {"level":"debug","ts":1571417228.9025588,"caller":"jobs/schedulers.go:166","msg":"Next run time for scheduler","scheduler_name":"PluginsSchedule
Configuring cluster transport encryption
Origin by Corvus is able to encrypt the messages sent within the cluster of a deployment using SSH tunneling. The guide walks through the deployment of this solution on Ubuntu 20.04, but it can be adapted for any Linux operating system.
While this document only describes the configuration of a three-node cluster, it is by no means limited to that number.
Prerequisites
- SSH port whitelisted between each node of the deployment.
- Active ufw/iptables on each node.
- Access to the root/sudo user of each node for configuration.
- A configured Origin by Corvus cluster.
- Origin by Corvus running with a dedicated service user.
- Origin by Corvus service is stopped on each cluster node.
Example environment
In this scenario there are three application nodes in our environment with the following hostname/IP mapping:
- transport-encryption-origin1: 10.10.250.146
- transport-encryption-origin2: 10.10.250.231
- transport-encryption-origin3: 10.10.250.165
Preparations
- Connect to each Origin by Corvus server with a sudo or root user.
- Make a note of the IP from each cluster member used for the internal communication.
- Ensure
AllowTcpForwardingis enabled in/etc/ssh/sshd_configof each cluster node.
SSH authentication
On each node, generate a SSH key-pair for the service account. In our scenario this is called origin:
sudo -u origin ssh-keygen -t rsa
Generating public/private rsa key pair.
Enter file in which to save the key (/home/origin/.ssh/id_rsa):
Enter passphrase (empty for no passphrase):
Enter same passphrase again:
Your identification has been saved in /home/origin/.ssh/id_rsa.
Your public key has been saved in /home/origin/.ssh/id_rsa.pub.
The key fingerprint is:
SHA256:redacted origin@transport-encryption-origin1
The location of the SSH key itself is irrelevant if company policies require the usage of another storage location.
Next, ensure that the SSH public key of each node is added to the authorized_keys file of the other nodes of the cluster. To do so, copy the contents of /home/origin/.ssh/id_rsa.pub of nodes 2 and 3, and add it to /home/origin/.ssh/authorized_keys of node 1.
Repeat this step for each node of the cluster. As a result, each node should be able to establish an SSH connection to the other nodes of the cluster.
ufw configuration
As a next step, allow SSH access from each of the other member nodes, e.g.:
- origin1 allows from origin2 and origin3
- origin2 allows from origin1 and origin3
- origin3 allows from origin1 and origin2
To do so, we add an exception in the firewall. The commands for origin1 look as follows:
sudo ufw allow from 10.10.250.231/32 to any port ssh
sudo ufw allow from 10.10.250.165/32 to any port ssh
sudo ufw status
Rule added
Rule added
Status: active

To                         Action      From
--                         ------      ----
22/tcp                     ALLOW       10.10.250.10
8065/tcp                   ALLOW       Anywhere
22/tcp                     ALLOW       10.10.250.231
22/tcp                     ALLOW       10.10.250.165
Repeat the same steps on the other nodes, replacing the IPs with the ones from the other member nodes. Do so for each member node, excluding the node itself.
Next, open /etc/ufw/after.rules and add the following block to the bottom of the file:
*nat
:POSTROUTING ACCEPT [0:0]
:PREROUTING ACCEPT [0:0]

-A OUTPUT -p tcp -d 10.10.250.231 --dport 8075 -j DNAT --to-destination 127.0.0.1:18075
-A OUTPUT -p tcp -d 10.10.250.231 --dport 8074 -j DNAT --to-destination 127.0.0.1:18074
-A OUTPUT -p tcp -d 10.10.250.165 --dport 8075 -j DNAT --to-destination 127.0.0.1:28075
-A OUTPUT -p tcp -d 10.10.250.165 --dport 8074 -j DNAT --to-destination 127.0.0.1:28074

COMMIT
Two lines always belong to a single node, so in a deployment with four nodes:
-A OUTPUT -p tcp -d ip_node_2 --dport 8075 -j DNAT --to-destination 127.0.0.1:18075
-A OUTPUT -p tcp -d ip_node_2 --dport 8074 -j DNAT --to-destination 127.0.0.1:18074
-A OUTPUT -p tcp -d ip_node_3 --dport 8075 -j DNAT --to-destination 127.0.0.1:28075
-A OUTPUT -p tcp -d ip_node_3 --dport 8074 -j DNAT --to-destination 127.0.0.1:28074
-A OUTPUT -p tcp -d ip_node_4 --dport 8075 -j DNAT --to-destination 127.0.0.1:38075
-A OUTPUT -p tcp -d ip_node_4 --dport 8074 -j DNAT --to-destination 127.0.0.1:38074
Please be aware that the ports on the right side must be unique, so if you have a cluster of six nodes, use 8075 and 8074 with 1 to 5 in front of it. If the cluster is of bigger size, additional ports must be used.
Ensure that your operating system has IP forwarding enabled using the following command:
sysctl -w net.ipv4.ip_forward=1
After that, reload the ufw rules and confirm that the iptable rules were successfully created:
iptables -t nat -L
Chain PREROUTING (policy ACCEPT)
target     prot opt source               destination

Chain INPUT (policy ACCEPT)
target     prot opt source               destination

Chain OUTPUT (policy ACCEPT)
target     prot opt source               destination
DNAT       tcp  --  anywhere             10.10.250.231        tcp dpt:8075 to:127.0.0.1:18075
DNAT       tcp  --  anywhere             10.10.250.231        tcp dpt:8074 to:127.0.0.1:18074
DNAT       tcp  --  anywhere             10.10.250.165        tcp dpt:8075 to:127.0.0.1:28075
DNAT       tcp  --  anywhere             10.10.250.165        tcp dpt:8074 to:127.0.0.1:28074
Repeat those steps for every node on the cluster. At the end of this section the following should be configured:
- SSH access enabled in firewall from each cluster node to another.
- Per node 2 iptables rules for port 8074 and 8075.
- IP forwarding enabled.
SSH configuration
As a next step, ensure that the SSH tunnels are created as part of the Origin by Corvus service start. To do so, create a file called pre_start.sh in /opt/origin/bin on origin1:
#!/bin/bash
ssh -N -f -o ServerAliveInterval=60 -o ExitOnForwardFailure=yes -L 18075:10.10.250.231:8075 10.10.250.231 || true
ssh -N -f -o ServerAliveInterval=60 -o ExitOnForwardFailure=yes -L 18074:10.10.250.231:8074 10.10.250.231 || true
ssh -N -f -o ServerAliveInterval=60 -o ExitOnForwardFailure=yes -L 28075:10.10.250.165:8075 10.10.250.165 || true
ssh -N -f -o ServerAliveInterval=60 -o ExitOnForwardFailure=yes -L 28074:10.10.250.165:8074 10.10.250.165 || true
Afterwards, set the executable bit on the shell script:
chmod +x /opt/origin/bin/pre_start.sh
Open the systemd unit file of Origin by Corvus and search for Type=Notify. After this, enter a ExecStartPre script that will be executed before Origin by Corvus itself is started:
[Service]
Type=notify
ExecStartPre=/opt/origin/bin/pre_start.sh
Reload the systemd daemon afterwards:
systemctl daemon-reload
Repeat the same steps on each of the member nodes and adapt the node IPs and amount of entries for your environment.
Cluster start
Once each node is configured, restart the service on each cluster and confirm that it's running using the command below:
systemctl start origin
systemctl status origin.service
● origin.service - Origin by Corvus
   Loaded: loaded (/etc/systemd/system/origin.service; static; vendor preset: enabled)
   Active: active (running) since Fri 2019-10-04 19:44:20 UTC; 5min ago
  Process: 16734 ExecStartPre=/opt/origin/bin/pre_start.sh (code=exited, status=0/SUCCESS)
Next, open the Origin by Corvus System Console and confirm that each node is reporting successfully in the High Availability section.